

Generally, you simply want a simple win, proper? That is a type of initiatives. A pair months again, I used to be taking a look at my guitars and guitar equipment and thought, it’s lastly time to do one thing with the neck I’ve had mendacity round for years. In attempting to determine an appropriate physique for the slapdash guitar I used to be about to construct, I discovered myself at a tractor provide retailer for LEGO-related causes. (The place else are you going to get a bunch of egg cartons with out consuming a bunch of eggs?) I observed that they occurred to additionally inventory ammo bins. Bam! It’s sturdy, it opens simply, and it’s (very) roughly guitar physique formed. I fortunately picked one up and began scheming on the way in which dwelling.
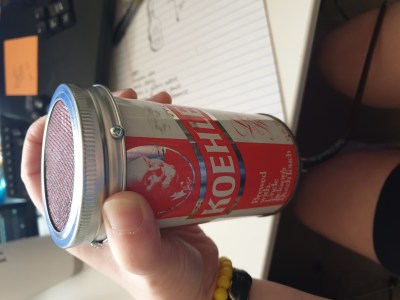
Having by no means constructed a cigar field guitar earlier than and being of a sure classic, I’m inclined to show to books as an alternative of the Web, so I stocked up from the library. Amongst my early selections was Making Poor Man’s Guitars by Shane Speal, who’s broadly thought of to be the guru on the topic. In flipping via the e book, I observed the beer can microphone undertaking and was instantly taken by the aesthetic of some cool previous 70s beer can with a 1/4″ instrument jack on the underside, simply asking for some soiled blues to be belted into it. I needed to construct one. Or twelve.
What It Is, Man
Now, don’t get your hopes up too excessive right here. It is a dust easy microphone that’s basically a piezoelectric disk wired to a 1/4″ instrument jack. You’ll sound such as you’re on AM radio, mainly.
On this case, the piezo is glued to the underside of a metallic lid, turning the entire thing right into a contact mic that’s significantly sizzling on the prime. There’s a little bit of froth rubber concerned right here as properly, which retains the mic in a cheerful medium between suggestions and sounding woofy, such as you’re speaking right into a blanket.
Collect Your Provides
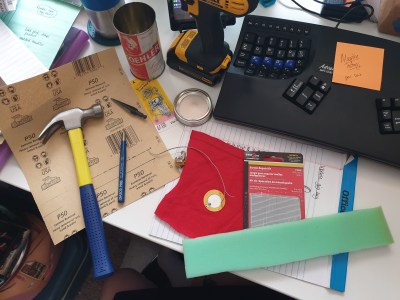 Whereas previous metal beer cans could make the coolest-looking microphones, you can also make considered one of these infants out of any tin that’s sturdy sufficient for the duty.
The neat factor about utilizing a tin as an alternative is that you have already got a lid, and don’t have to fret about sourcing the fitting measurement of Mason jar lid to suit. You’ll be able to see the whole checklist of instruments and provides on the IO web page, however you’ll mainly want a tin, a lid, a piezo disk, a 1/4″ guitar jack, wire, foam rubber, and a few primary instruments like a hammer, heart punch, and a drill.
Prep Work
In case you’re utilizing a beer can, you can’t use it as such — you will need to take away the lid. That is most simply accomplished with a side-cutting can opener, although you possibly can spend 3-5 minutes sanding it throughout a chunk of 50-grit after which pry it off as soon as you possibly can see the seam, or if you happen to’ve received a belt sander, then bully for you. This leaves a little bit of a tough edge, which you’ll cowl with adhesive felt, or else felt and superglue. This actually helps friction-fit the lid, by the way in which.
Talking of the lid — if utilizing a Mason jar lid, it most likely has a white coating on the underside. You’ll want to scrape this away with a few of that 50-grit sandpaper (or no matter you’ve received).
The Primary Plan
There are a few steps that should occur it doesn’t matter what you’re utilizing for the mic physique — drilling out the jack gap, and wiring up the center. You’ll want a 3/8″ gap to mount the 1/4″ guitar jack. I extremely suggest utilizing a uni-bit for this as an alternative of a collection of bigger bits as a result of they make such clear holes, and naturally, utilizing a middle punch first so the bit doesn’t stroll.
In wiring up the piezo to the guitar jack, I used stranded wire as a result of the connection to the piezo is so tenuous. I additionally used a beneficiant quantity of sizzling glue to safe these connections after I mounted the piezo to the underside of the lid.

The earlier collector opened it on the backside. The additional holes don’t have an effect on the sonic high quality.

Testing, 1-2
I like to check these at each step of the way in which simply to ensure I haven’t broken the piezo. Simply plug it into an amp or a {hardware} interface and ensure you can hear tapping on the piezo. I’ll take a look at it as quickly because the solder cools, after I’ve mounted the jack, once more after mounting the piezo, and naturally, in the course of the “tuning” a part of the construct the place I work out how a lot foam must be in there.
Make It Look the Half
In case you checked out the parts checklist on the IO web page, you might need seen a few unusual bits just like the purple t-shirt and the window display restore patch. In case you’re utilizing a beer can or different lid-less tin with a Mason jar lid as a replacement, that is the place it begins to appear like a microphone. Use the Mason lid ring to hint a circle on the shirt, and once more to around the corners on the display restore patch. Flatten the t-shirt throughout the lid and place the display on prime, then take the lid ring and strain match it to the can. It ought to match properly, however we’re nonetheless going to shut it up and make it look good. Go forward and take a look at it once more.


Take away the lid, taking care to not detach the piezo from the underside. In case you used a Mason jar lid, it’s seemingly that it’ll al keep collectively throughout this course of. Reduce a strip of froth that’s 2″ longer than the can and stuff it inside, then put the lid again on and maintain it down tight whilst you take a look at for suggestions or woofy-ness.
 You’re virtually able to rock out! With the lid on and the mic examined and tuned, mark 4 holes across the lid and drill via each lid and tin with a 1/16″ bit. Then safe the lid with sheet metallic screws.
Going Additional
I’m fairly glad with the way in which this factor sounds, however there may be room for enchancment. For starters, I might add a quantity pot in order that if I do get suggestions, I can simply flip it down as an alternative of simply ripping out the cable.
Don’t wish to maintain the mic? Make a stand for it. As a way to document that ditty above, I rested the mic on my legume-filled mouse-hand wrist relaxation, pointed roughly between my sound gap and the guitar’s.
Ideally, I might take this mic locations and use it in efficiency, however I would want some type of particular holder to interface it with a typical mic stand. So use your creativeness, and recycle extra issues within the course of (if you happen to can).